티스토리 뷰
[#4 Netflix OSS Zuul 구축] Spring boot 기반 마이크로서비스 아키텍처(Microservices Architecture, MSA)
Mr.spock 2021. 3. 31. 08:21

#4 Netflix OSS Zuul API Gateway 구축
spring.io/projects/spring-cloud-netflixnetflixtechblog.com/announcing-zuul-edge-service-in-the-cloud-ab3af5be08ee
Announcing Zuul: Edge Service in the Cloud
the latest addition to Netflix’s Open Source Software suite
netflixtechblog.com
Zuul은 API Gateway이다 API Gateway는 KONG도 있고 여러 다른 제품들도 있지만 Java 기반의 프로젝트를 진행하고 있고, 세계에서 가장 MSA를 잘하는 기업 중 하나인 Netflix에서 만들었다니 믿음이 간다.
Zuul의 기능을 우아한 형제들의 기술 블로그를 통해 간단히 살펴보면 (상세한 내용은 가서 보는것이 좋다)
- Authentication and Security
- 클라이언트 요청시, 각 리소스에 대한 인증 요구 사항을 식별하고 이를 만족시키지 않는 요청은 거부
- Insights and Monitoring
- 의미 있는 데이터 및 통계 제공
- Dynamic Routing
- 필요에 따라 요청을 다른 클러스터로 동적으로 라우팅
- Stress Testing
- 성능 측정을 위해 점차적으로 클러스터 트래픽을 증가
- Load Shedding
- 각 유형의 요청에 대해 용량을 할당하고, 초과하는 요청은 제한
- Static Response handling
- 클러스터에서 오는 응답을 대신하여 API GATEWAY에서 응답 처리
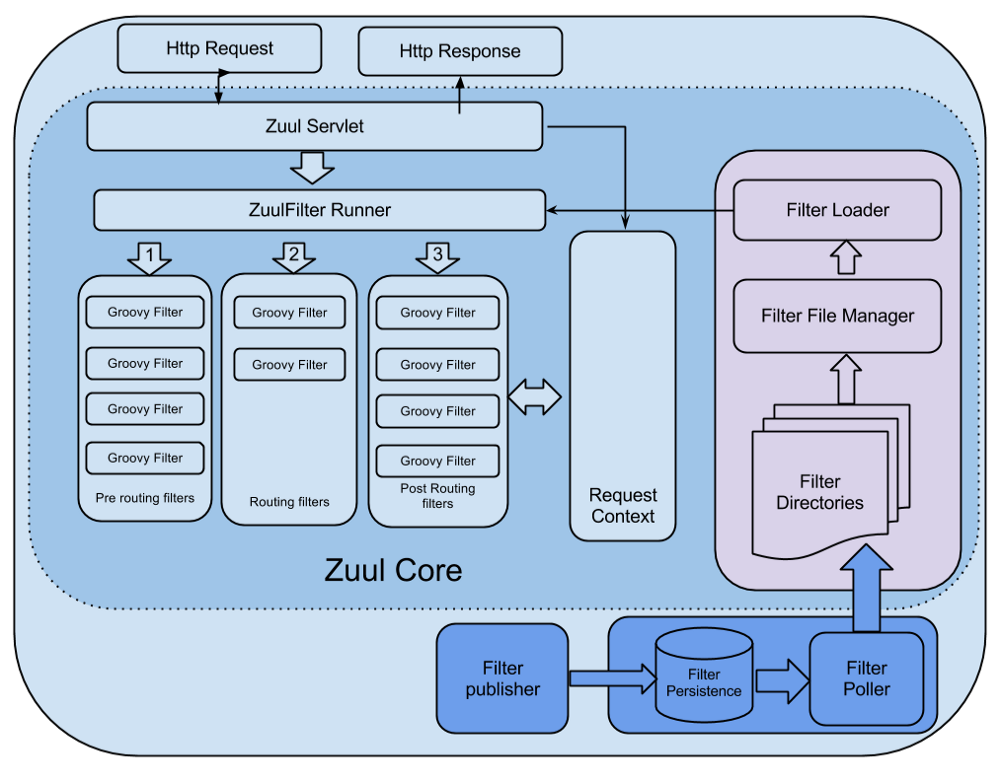
Zuul의 구조는 아래와 같다.

API 기반의 프로젝트를 지속적으로 하면서 API Gateway에 대한 필요성을 점점 느끼게 되었고, 이번에 처음으로 MSA형태로 프로젝트를 구축하면서 API Gateway를 사용하게 되어 기대가 된다. 설명은 다른 블로그에서 자세히 다루고 있으니, 곧바로 테스트 소스를 작성해 보자
- Spring Cloud Netflix Zuul 구축을 위한 프로젝트 생성
프로젝트 생성 방식은 별도 설명하지 않겠다. 앞의 글에서 여러 번 설명을 했기 때문에 아래 내용 기준으로 일단 생성을 한다.
Spring boot Version : 2.3.9
Language : Java
Group Id : com.example
Artifact Id : zuul
Packaging Type : war
Java version : 16
dependencies : Spring Web, Spring Boot Actuator, Eureka Client, Netflix Zuul
프로젝트 생성을 한 뒤 /src/main/resources/application.properties 파일을. yml파일로 변경하고 아래와 같이 내용을 작성한다.
server:
  port: ${PORT:7777}
spring:
  application:
    name: zuul

endpoints:
  restart:
    enabled: true
  shutdown:
    enabled: true
  health:
    sensitive: false

management:
  security:
    enabled: false
  endpoints:
    web:
      exposure:
        include: "*"

eureka:
  client:
    register-with-eureka: true
    fetch-registry: true
    serviceUrl:
      defaultZone: http://localhost:9999/eureka/

# Ribbon global settings
ribbon:
  retryable: true
# Max number of retries on the same server (excluding the first try)
  MaxAutoRetries: 0
# Max number of next servers to retry (excluding the first server)
  MaxAutoRetriesNextServer: 1
# Whether all operations can be retried for this client
  OkToRetryOnAllOperations: true
# Connect timeout used by Apache HttpClient
  ConnectTimeout: 30000
# Read timeout used by Apache HttpClient
  ReadTimeout: 30000
위의 의존성에서나 설정에서 보이는 Eureka Client는 왜 포함되어 있는 것이냐면, HTTP Request를 받게 되면 API Gateway에서는 http://api-gateway-address/api/service-id/test 형태로 받게 될 텐데 해당 주소는 어떤 서비스에 있는지 알 수가 없다, 특히 클라우드 환경에서는 동적으로 생성 및 할당되는 IP나 PORT정보를 Gateway에서 파악할 수 없기 때문에 eureka server, client 이용해서 이 문제를 해결한다.
eureka client는 30초마다 나의 상태를 server로 알려주기도 하지만 반대로 server에서 서비스들의 정보를 내려받아서 로컬 레지스트리에 저장을 하기도 한다. 이렇게 받아온 서비스들의 정보로 해당 서비스를 호출 할 수 있도록 되어 있다.
대부분의 옵션은 두고 eureka.client.serviceUrl.defaultZone 부분은 구축하였던 eureka서버 URL을 입력해야 한다.
그리고 ZuulApplication.java 파일에 아래와 같이@EnableDiscoveryClient, @EnableZuulProxy 어노테이션을 붙여준다.
import org.springframework.boot.SpringApplication;
import org.springframework.boot.autoconfigure.SpringBootApplication;
import org.springframework.cloud.client.discovery.EnableDiscoveryClient;
import org.springframework.cloud.netflix.zuul.EnableZuulProxy;

@EnableZuulProxy
@EnableDiscoveryClient
@SpringBootApplication
public class ZuulApplication {

	public static void main(String[] args) {
		SpringApplication.run(ZuulApplication.class, args);
	}

}
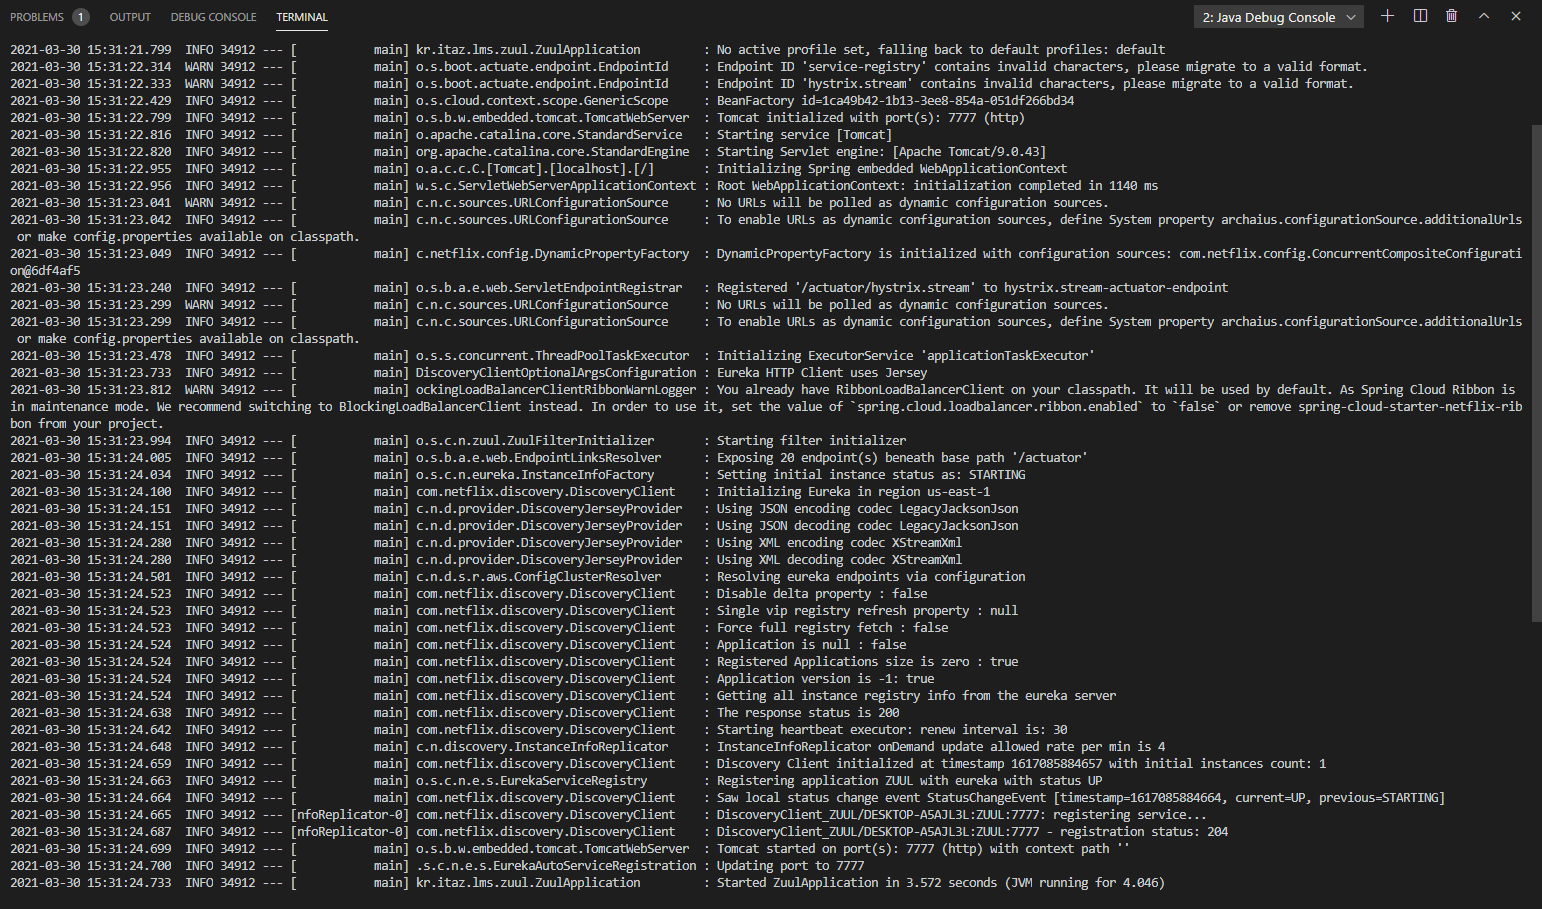
이렇게 해둔 상태로 실행(F5)하게 되면 아래와 같이 Gateway가 정상적으로 구동 됨을 확인할 수 있다.

아참 정상적으로 동작하려면 Eureka서버도 동작하고 있어야 한다. Eureka서버에 가보면 아래와 같이 Zuul Gateway도 등록되어 있음을 알 수 있다. 등록되어 있다면 Gateway에서 MS2의 위치도 안다는 뜻이다.

아래와 같이 Gateway에 입력해서 사용가능한 서비스들에 대한 라우트 목록을 살펴보자
$ curl -X GET "http://localhost:7777/actuator/routes" 
eureka에 등록 된 정보와 같이 ms2와 zuul에 대한 접근이 가능하다고 나타난다. 처음에 ms2프로젝트에 컨트롤러를 하나 추가해서 테스트를 해보자
import java.util.HashMap;
import java.util.Map;

import org.springframework.http.HttpStatus;
import org.springframework.http.ResponseEntity;
import org.springframework.web.bind.annotation.RequestMapping;
import org.springframework.web.bind.annotation.RequestMethod;
import org.springframework.web.bind.annotation.RestController;

@RestController
public class Ms2Controller {

    @RequestMapping(value = "/test", method = RequestMethod.GET)
    ResponseEntity<Map<String, String>> sample() {
        ResponseEntity<Map<String, String>> response = null;

        Map<String, String> resMap = new HashMap<String, String>();
        resMap.put("type", "First eureka client!");
        resMap.put("message", "Spring Cloud is awesome!");

        response = new ResponseEntity<Map<String, String>>(resMap, HttpStatus.OK);

        return response;
    }
}
위와 같이 작성한 후 Zuul을 통해 호출해 보자 ms2 서비스는 ms2라는 아래와 같은 설정을 가지고 있다.
spring:
  profiles:
    active: dev
---
server:
  port: 80

spring:
  profiles: dev
  application:
    name: ms2

eureka:
  client:
    service-url:
      defaultZone: http://localhost:9999/eureka/
    register-with-eureka: true
    fetch-registry: true
설정에서 볼 수 있듯이 application.name 이 ms2로 되어 있으니 eureka에 ms2라는 서비스 아이디로 등록되어 있을 것이다.
$ curl -X GET "http://localhost:7777/ms2/test"
위와 같이 게이트웨이 주소를 호출하면서 서비스 명 / api 명을 입력하니 자동적으로 해당 서비스의 해당 api로 호출하고 리턴을 받아온다. http://게이트웨이 주소/서비스 아이디/api주소
이렇게 쉽게 API Gateway가 구성되다니 놀랍다. 물론 filter며 인증이며, 가야 할 길과 해야 할 일들이 많이 남아있지만, 일단 시작을 하였고 구축을 했기 때문에 절반은 했다고 생각한다.
다음 글에서는 마이크로 서비스들 간의 통신에 사용하는 메시지 큐 Netflix Kafka에 대해서 알아보고 지금과 같이 기본 세팅을 해보는 것으로 하겠다.
'development' 카테고리의 다른 글
- Total
- Today
- Yesterday
- 신세계 아카데미
- slueth
- spring boot
- zookeeper 클러스터
- Python
- MSA
- Eclipse
- axios
- 프레임워크
- Kafka
- ADL-LRS
- 트랜잭션 추적
- 취미생활
- 목탄
- 초보
- 풍경그림
- zookeeper
- 카프카클러스터
- windows환경
- 그림 그리기
| 일 | 월 | 화 | 수 | 목 | 금 | 토 |
|---|---|---|---|---|---|---|
| 1 | 2 | 3 | 4 | 5 | 6 | 7 |
| 8 | 9 | 10 | 11 | 12 | 13 | 14 |
| 15 | 16 | 17 | 18 | 19 | 20 | 21 |
| 22 | 23 | 24 | 25 | 26 | 27 | 28 |
