티스토리 뷰
[#2 Spring Cloud Config Server 구축] Spring boot 기반 마이크로서비스 아키텍처(Microservices Architecture, MSA)
Mr.spock 2021. 3. 31. 08:21
#2 Spring Cloud Config Server 구축
구축이라고 해서 대단한 내용이 들어있지는 않고, Spring Cloud Config Server를 구축하고 일반 서비스에서 해당 서버를 통해 동적으로 환경 변수를 가지고 오는 테스트를 해볼 예정이다.
- Spring Cloud Config Server 구축을 위한 프로젝트 생성
Spring boot 기반 마이크로서비스 아키텍처(Microservices Architecture, MSA) #1 기초개발환경 구성
#1 기초개발환경 JAVA(openjdk16), IDE(vscode), Spring-Initializr(maven, 2.3.9, .yml) MSA로 개발을 하기 전 개발하려는 프로그램의 규모, 성격, 운영 방식 등을 고려해서 과연 MSA로의 개발이 적합한지, 적..
mr-spock.tistory.com
위의 링크에 작성된 "기초개발환경 구성"에서 설명한 openjdk 16, vscode, Spring-Initializr를 기반으로 프로젝트를 생성한다. [ Ctrl + Shift +P ] 버튼을 눌러 아래와 같이 검색하여 선택한다.
>spring initializr
Maven기반으로 구성할 것이라 Create a Maven Project를 선택한다. Gradle이 익숙하고 편하신 분은 Gradle을 선택해도 관계없다.
spring boot 버전은 2.3.9 (처음에 2.4.4로 했었는데 eureka쪽이 문제가 생겨, 버전을 내리니 정상 동작하였다.)

언어는 당연히 Java

그룹은 아래와 같이 com.example을 해도되고, 어떤 것을 해야 될지 잘 모르겠다면, 예를 들어서 구글 드라이브에 경우 도메인을 거꾸로 작성하여 com.goolge.drive 이런 식으로 Group Id를 작성하면 된다.

Artifact Id는 프로젝트 명 정도로 보면 될 것 같고, 소문자로 간략히 작성하면 된다, config서버역활을 할 거라서 config라고 작성하였다.

packaging type은 편한 방법대로, 나는 war

Java 버전은 openjdk를 16버전으로 세팅하였기 때문에 16으로 설정

dependencies는 두 개 정도만 있으면 될 것 같다. Web도 필요하지 않을 것 같긴 하다
 Config Server - Spring Cloud Config
 Spring Web - Web
필요한 dependencies를 다 선택 후 아래처럼 선택 된 dependency를 선택하면 세팅할 위치를 선택하는 창이 나타난다.


config (Artifact Id) 라는 폴더가 생성되니 별도의 폴더를 만들어 주지 않고 위치만 지정하면 된다.
우측 하단에 현재 위치에 프로젝트를 추가할지 새창으로 열지 물어보는데 상황에 맞게 선택을 하면 되고, 아래와 같이 프로젝트가 세팅이 된다.

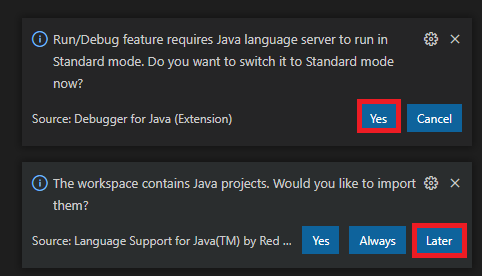
아마도 #1의 환경구축편을 잘 따라 해서 vscode에 확장팩이 설치되어 있다면, 이 상태에서 F5을 눌러 Java를 선택하면 빌드 및 내장 톰캣이 구동된다.

Java를 선택하면 우측하단에 아래와 같이 뜰 수도 있는데 아래처럼 선택해주면 된다.

컴파일 시간이 지나고...

아래처럼 서버가 정상적으로 시작 됨을 알 수 있다.

이게 끝은 아니고 이제 시작이고. 이제 spring cloud server에 대한 세팅을 해보자
일단 /src/main/resources/application.properties파일은 나는 yml 형식이 좋으니 파일명을 바꾼다. application.yml으로
그리고 해당 파일에 아래와 같이 작성한다.
server:
  port: 8888
spring:
  cloud:
    config:
      server:
        git:
          default-label: main
          uri: https://github.com/calisua1/spring-cloud-config-repository
Config서버는 주로 8888 포트를 쓴다라고 어디서 본거 같다. 그리고 spring.cloud.config.server.git.uri 부분은 각 서비스에서 가져올 환경 설정 파일이 존재하는 github주소이다. 테스트해보기 위해서 github를 저장소를 생성하고 테스트용으로 환경 설정 파일을 하나 올려뒀다. ms1-dev.yml 파일이고 내용은 아래와 같다.
* 여기서 파일명이 중요하다 파일명은 [spring-application-name]-[spring-profiles].yml로 작성해야 한다.
ms1:
  profile: I'm dev ms1
  comment: Hello! updated by Spring Bus with webhook!
그리고 /src/main/java...../ConfigApplication.java 파일을 열어서 아래와 같이 @EnableConfigServer를 입력한다.
import org.springframework.boot.SpringApplication;
import org.springframework.boot.autoconfigure.SpringBootApplication;
import org.springframework.cloud.config.server.EnableConfigServer;

@SpringBootApplication
@EnableConfigServer
public class ConfigApplication {

	public static void main(String[] args) {
		SpringApplication.run(ConfigApplication.class, args);
	}

}
vscode에 확장팩을 다 설치했다면, @EnableConfigServer의 끝 부분에 커서를 두고 [Ctrl + Space]를 눌리면 아래와 같이 해당 소스를 import 할 수 있다.

이렇게만 하더라도, Server부분은 최소한의 세팅으로 작업이 끝났다.
이제 저기 있는 github에 있는 설정 파일을 Config서버를 통해서 각 서비스에서 잘 가져가 지는지 테스트를 해봐야 한다.
위에서 한 것처럼 Spring-Initializr를 통해서 프로젝트를 하나 더 생성해 보도록 하겠다. 아래와 같이 설정해서 생성하도록 하겠다.
Spring boot Version : 2.3.9
Language : Java
Group Id : com.example
Artifact Id : ms1
Packaging Type : war
Java version : 16
dependencies : Spring Web, Config Client-Spring Cloud Config
생성되면 /src/main/resources/bootstrap.yml 파일을 생성한다. bootstrap.yml은 환경설정 파일 역할을 하지만, application.yml보다 더 빨리 실행된다고 보면 된다. 파일 내용은 아래와 같이 작성한다.
여기서 spring-application-name이 왜 ms1이며 profiles가 왜 dev인지 모르겠다면 위의 github에 올라가 있는 파일명을 다시 한번 보길 바란다.
spring:
  profiles:
    active: dev

---
spring:
  profiles: dev
  application:
    name: ms1
  cloud:
    config:
      label: main
      enabled: true
      uri: http://localhost:8888
      fail-fast: false

management:
  endpoints:
    web:
      exposure:
        include: "*"

server:
  port: 8089
이제 서비스 파일을 두 개를 만들어서 비교를 해볼 것이다. 하나는 DynamicConfigService.java이고, 또 하나는 StaticConfigService.java파일이다. 이름에서 알 수 있듯이 환경 변수가 Config서버를 통해서 동적으로 변경되는 것을 확인할 수 있는 서비스와 그렇지 않은 서비스이다.
DynamicConfigService.java
import java.util.HashMap;
import java.util.Map;

import org.springframework.beans.factory.annotation.Value;
import org.springframework.cloud.context.config.annotation.RefreshScope;
import org.springframework.stereotype.Service;

@Service
@RefreshScope
public class DynamicConfigService {
    @Value("${ms1.profile}")
	private String profile;
	@Value("${ms1.comment}")
	private String comment;

	public Map<String, String> getConfig() {
		Map<String, String> map = new HashMap<>();
		map.put("profile", profile);
		map.put("comment", comment);
		return map;
	}
}
StaticConfigService.java
import java.util.HashMap;
import java.util.Map;

import org.springframework.beans.factory.annotation.Value;
import org.springframework.stereotype.Service;

@Service
public class StaticConfigService {
    @Value("${ms1.profile}")
	private String profile;
	@Value("${ms1.comment}")
	private String comment;

	public Map<String, String> getConfig() {
		Map<String, String> map = new HashMap<>();
		map.put("profile", profile);
		map.put("comment", comment);
		return map;
	}
}
위의 두 소스의 차이점은 Dynamic의 @RefreshScope부분만 다르다. 일단, 서비스를 만들었으니 호출할 수 있는 컨트롤러도 생성하도록 하겠다.
ConfigController.java
import org.springframework.beans.factory.annotation.Autowired;
import org.springframework.web.bind.annotation.GetMapping;
import org.springframework.web.bind.annotation.RestController;

@RestController
public class ConfigController {
    private final StaticConfigService configStaticService;
	private final DynamicConfigService configDynamicService;

	@Autowired
	public ConfigController(StaticConfigService configStaticService, DynamicConfigService configDynamicService) {
		this.configStaticService = configStaticService;
		this.configDynamicService = configDynamicService;
	}

	@GetMapping(value = "/static")
	public Object getConfigFromStatic() {
		// http://localhost:8089/static
		return configStaticService.getConfig();
	}

	@GetMapping(value = "/dynamic")
	public Object getConfigFromDynamic() {
		// http://localhost:8089/dynamic
		return configDynamicService.getConfig();
	}
}
위와 같이 작성하고 서버를 실행한다.(F5) 아까 위에서 생성된 Config Server도 실행되어 있어야 한다.
서버를 실행하면 아래와 같이 로그 첫 줄 부근에 config server 관련된 로그를 볼 수 있다.

마찬가지로 Config 서버의 로그도 확인해보면 아래와 같이 나타난다.

이제 컨트롤러에 작성해뒀던 http://localhost:8089/static , http://localhost:8089/dynamic를 각각 호출해보자
$ curl -X GET "http://localhost:8089/static"
$ curl -X GET "http://localhost:8089/dynamic"
위와 같이 동일하게 나타남을 알 수 있다. 그대로 둔 상태에서 git에 있는 설정 파일 정보를 변경해보자
ms1:
  profile: I'm dev ms1 change!!!
  comment: Hello! updated by Spring Bus with webhook! change!!
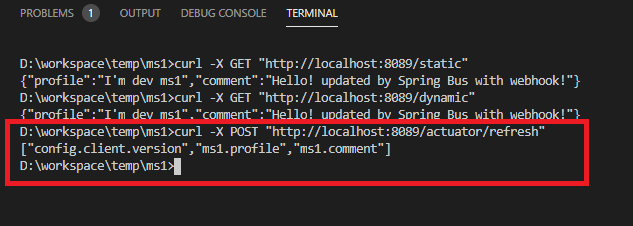
이렇게 제일 뒤에 change!!!라고 내용을 변경하고 아래와 같이 갱신작업을 해줘야 한다.
curl -X POST "http://localhost:8089/actuator/refresh"서비스가 많을 경우 자동으로 해주는 spring-cloud-bus라고 따로 있다고 하니 그건 다음번에 살펴보자 client의 bootstrap.yml에서 management.endpoints.web.exposure.include 옵션을 "*"나 refresh로 해주지 않을 경우 위의 /actuator/refresh가 동작하지 않을 수 있으니 주의 하자

갱신 후 다시 각 컨트롤러를 호출하면 아래와 같이 한쪽은 동적으로 변경된 환경설정 정보를 반영하여 나타나고 한쪽은 변경되지 않고 출력됨을 확인할 수 있다.

서비스가 그렇게 많지 않다면, Config서버를 쓰는 것이 꼭 필수적이라 볼 수는 없을 것 같으나, 서비스가 나중에 늘어나게 되면 한 곳에 모아서 관리하게 되면 편리할 수도 있을 것 같고, 고민이 되는 부분이다. 설정이 해당 프로젝트에서 바로 확인되지 않으니 불편할 것 같기도? 하고.. 실 사용은 좀 고민을 해봐야 될 것 같다.
'development' 카테고리의 다른 글
- Total
- Today
- Yesterday
- MSA
- slueth
- zookeeper
- 풍경그림
- ADL-LRS
- Kafka
- 목탄
- 프레임워크
- Eclipse
- windows환경
- spring boot
- 초보
- zookeeper 클러스터
- Python
- 트랜잭션 추적
- 취미생활
- 카프카클러스터
- axios
- 신세계 아카데미
- 그림 그리기
| 일 | 월 | 화 | 수 | 목 | 금 | 토 |
|---|---|---|---|---|---|---|
| 1 | 2 | 3 | 4 | 5 | 6 | 7 |
| 8 | 9 | 10 | 11 | 12 | 13 | 14 |
| 15 | 16 | 17 | 18 | 19 | 20 | 21 |
| 22 | 23 | 24 | 25 | 26 | 27 | 28 |
